Sunday, December 18, 2011

Chicago & DC Millinery Classes--Flowermaking, Flat Felt, and Felt Blocking

Last post of the year, dear readers!  We'll start fresh in 2012!

Spent a lot of time in November teaching the last two classes of 2011.  It was a whirlwind year of teaching and I thank all the venues and the many, many students who spent their hard earned money and time to come take a class from me.  I'm very honored to have met and worked with so many this past year.

First--Chicago!  Two one-day classes at TLD Designs in Westmont, IL.  Looking for some great fiber classes?  Check them out! 

The first class was Blocking Felt, and was meant for those who had never blocked felt before.  We started with very simple blocks--pillboxes, gentle domes, Fedoras.  After a bit of confidence building they progressed to some free-form blocking.  Try it some time...you'll have a blast.  Sorry I don't have any pix from that class as my camera battery went down on me.  Shame on me!

The second class was entitled The Complex Block--Blocking Fur Felts. Students worked with the dozen or so  complex hatblocks I sent in from my studio.  These are from my collection and included quite a few puzzle blocks.  Enjoy the pictures of these ladies and the hats they created.  Learning to steam and pull hoods over a block is a little more challenging than most imagine, but worth it in the end.


Love the large beret you see in the pictures above.  Note that the hatblock has cinch lines to pull in the felt to make the headsize opening.  The first picture shows what it looked like when it came off the block before the excess was cut away.


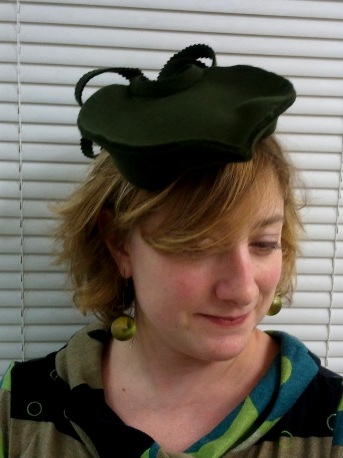
And isn't this a great hat?  Sorry I didn't make a picture of the block.  It will fit further down on the head once she get the petersham sewn in...in the above picture there are lots of pins underneath!  Ouch!!  Love this shape, one of the puzzle blocks.  I have it in the shop in navy with some pheasant and turkey feathers on that high side of the brim.


A seemingly easy block in the picture above, but wait!  The brim must be pulled over and under to create a slightly rounded brim edge.  So what happens is that the edge of the hood is pulled back into the headsize opening underneath.  Not as easy as it looks my friends!

Next stop--Alexandria, Virginia...a suburb of Washington, DC.  Class was held at The Art League School, one of my favorite places to teach.  If you ever consider taking one of my classes there be forewarned...they fill VERY quickly so don't wait until the last minute.  I'll be teaching there twice next year.  


This class was Retro Hats From Flat Felt Skirting and French Flowermaking.  The thought being that they could use the flower on their retro-inspired felt hat.  Above is the final group photo of lovely, lovely flowers made in class.

Some of the fabrics drying after they have been processed.


Petals and parts have been cut from the silks, cottons, velvets, linens, and other yummy textiles.  Love to see a flower with different fabrics, colors, textures all mixed together...that is, if they are all complementary colors.  We had some beautiful examples in this class, as you saw in the group photo above.

Below you will see a few of the retro-inspired hats made during class.  Some students used supplied patterns, or used some of the flat felt vintage hats I brought along for inspiration, or came up with their own designs.  This class did an INCREDIBLE job with the flat felt!  LOVE, LOVE, LOVE!


OK, so that's it for me for 2011!  I'm busy planning for my teaching trip to the International Millinery Forum in Australia in just a short few weeks.  I'll post about that when I return at the end of January. That will undoubtedly be a wild and crazy blog post with some of those jazzed Aussie hats I love so much!!!

Until then, have a wonderful holiday season...Merry Christmas and Happy New Year!


Monday, November 14, 2011

Hats in France and Italy: an assortment

 During our first week in Paris we discovered there would be an art opening, while we were traveling, that was completely dedicated to Coco Chanel.  I'm sure everyone reading this blog will know that Gabrielle 'Coco' Chanel was a milliner before she started her couture fashion house in Paris.

The paintings you will see here were from that incredible exhibit at the Opera Gallery on St. Honore, entitled Coco: The Testimony of Black and White.  The artist, Lita Cabellut, has a very unique biography.  She was born to a prostitute in Barcelona, never knew her father, raised by a Gypsy grandmother, who never sent her to school.  Somehow she ended up attending an art school in Amsterdam.  Quite a remarkable story!

When we returned to Paris at the end of our trip, I was set on seeing the exhibit.  What I didn't expect was the SIZE of these paintings!  Most would not fit on any of our living room walls.  They were HUGE!  I was so drawn to these very mesmerizing painting and the vibrant spirit they created in the space. 


If I remember correctly, there were 34 paintings in the exhibit, with the vast majority of them being paintings of Chanel.  A few were of her models...I'm assuming models she had with here for quite a while in the couture business.

Again, as you look at these, imagine they are the size of living room walls...from ceiling to floor...and larger!


The following photos are random shots of hat-related sights in France and Italy.  Enjoy for what they are.

 In a shop window in Montmartre, Paris.


We stayed in Vernazza, Italy, in the Cinque Terre, for several days.  The shots above and below were from a restaurant right on the harbor.  All their centerpieces for tables were hats!  Love it!


The photo below is from Nice...the French Rivera.  We were strolling along the Promenade des Anglais, looked down on the top of a cafe, and saw this!  Seagull with top hat!

That's it for my posts about France and Italy.  Hope you enjoyed.  And thanks for reading!

Tuesday, November 8, 2011

Retro Hats From Flat Felt Skirting--Millinery Course in France

 Part Two of my trip to France.  Here's the real reason I went to France...to teach!  Yes, it was a great reason to see the beautiful sites in Paris, Nice, and Cinque Terre (Italy) leading up to our arrival in St. Quentin La Poterie, in the South of France, but teaching was the 'working' part of the trip.

If you've been reading this blog for awhile you know I love teaching and passing on millinery skills.  But being able to teach these skills in France was an absolute honor.  And I thank Lucy Till for the opportunity.  If you are ever in the area around Uzes or Avignon, make a trip to St. Quentin and specifically to Lucy's atelier.

 St. Quentin is a tiny village just bursting with creativity as it has been an important pottery making area for hundreds of years...something about the clay in this area.  But there is also something about shaping and molding felts and straws that seems to be a perfect fit.  And besides, a village needs more than just one type of craft, right?  Note Lucy's sign in aqua...Creatrice de Chapeau!


One of the flat felt skirting hats, in progress.  Flat felt is worked differently than capelines and hoods, as patterned pieces of felt are stitched together.  Lovely use of color here. Note she's marked CF on her creation with a beaded pin.  For those of you who are new to millinery...we always mark center front (CF) on our hats and it is either done with a pin or with a stitch of thread.


A picture of Lucy working hard on one of her flat felt hats.  We worked around Lucy's big table in the center of the shop.  This created lots of interest from passers-by, many who came in to see exactly what all these women were doing!  

I took quite a few patterns that everyone could be use to make their vintage-inspired hats.  All my patterns have been taken from actual vintage hats.  I've collected flat felt hats through the years and took about 6 of them to France with me, again, as inspiration.


Here's another hat in progress, taken from one of the vintage hats I took along.  Wish I had a picture to show of the finished product AND the vintage hat.  The drooping part you see will eventually be pulled up and under itself to create a doubled brim piece, also gathered to make it fit nicely.

In the background you see a beautiful grey velour hat of Lucy's.  She was recreating it in purple, for a customer. Loved the positive/negative leaves from the cutouts along the brim.


On the last day of class, a Friday, the shop became a fun-filled gathering spot!  Lots of people in the shop trying on Lucy's hats, and yes, observing what we were doing with felt.  I have to tell you a quick little story about the lady on the far right.

She and her husband, along with two other couples, were visiting from the US.  Everyone in class spoke English so lots of conversation ensued.  It turns out all 6 were from Mississippi, my home state!  What are the odds of finding someone from home in a tiny village in France?  Anyway, the woman on the right wanted to buy hats for her granddaughters back in Mississippi.  Lucy only had the one children's hat, the teacup hat in from of the customer.  Ah, but she needed THREE hats.  Could we make her three hats before the end of the day????  They were leaving the area the next morning.

 Here the discussion of what we would/could make, price negotiations, time negotiations (!) and the purchasing of even more hats from Lucy's shop!  We decided on flat felt berets as this was the quickest thing we would be able to make in a matter of hours, a typical French 'hat', and a great souvenir from Grandmother's trip. BUT we didn't know the children's headsizes.  However, being industrious milliners we came up with a design plan and got to work. In a hurry!!! Lucy and I had less than 4 hours to design, work out the problems with a new design, cut, create, and embellish.

 Meanwhile, Meaghan and Sarah finished up their hats.  As it turned out, we spent a good deal of time on that Friday doing free-formed felt.  Everyone was astounded at the many designs you can create with this method.  Even though it wasn't a part of the class curriculum I think everyone found a new, easy way to create some fabulous hats--free-forming!  Meaghan, Sarah, Katia, and even Lucy are now anxious to get going on these type hats.


Here's a picture of the finished product you saw earlier in the post, and a fabulous heart-shaped hat that was free-formed by Sarah.


And lastly, and I do mean lastly (it was a looong afternoon!), our gentleman from Mississippi came and picked up all the hats for his wife and granddaughters.  I just HAD to take a picture of him with a big grin on his face and a pink bag to walk down the street with!  Priceless!

Wednesday, October 26, 2011

Paris Millinery--Supplies, Blockmakers and More!


Back from France and Italy!  I have so many things to tell you. I'll probably break the trip into two posts.

But first---PARIS!  This was my first trip to the City of Lights and I can tell you I can't wait to get back.  What a beautiful city!  Lots of hustle and bustle, but somehow at a slower pace, if that makes sense.  I love the cafe society, the long lunches, the lighter fare, and of course the fashionable French women...and men.

But this post is about the millinery establishments I visited...and wanted to visit while there.

First, La Forme.  If you are not familiar with La Forme I am here to tell you that this is probably one of the last 'true' hatblock makers in the world.  Yes, there are those you make fabulous blocks on a lathe.  One of these is Guy Morse-Brown, in the UK, who makes outstanding crown, brim and fascinator blocks.  (I stayed with Guy and Ann when I taught at the Womborne School of Millinery and they are lovely people.) But there is a difference in what Monsieur Lorenzo Re does.  He actually carves the blocks by hand; a sculptor of wood. And you should see the sculptures!


I had contacted Madame Re to ask for an appointment and was graciously given one.  La Forme is almost hidden.  It took my husband and me over an hour to locate their establishment and we had a map and an address!  Later we discovered this is not unusual in finding addresses in Paris. If you look closely you will see that I'm pointing to the tiny sign announcing La Forme!


We were ushered into their apartment and Lucie Re and I quickly discovered that they didn't speak English and my French is so very poor that we both relied on the few words we knew in common.  I was a little intimidated being in the company of such an important man in the industry! Monsieur Re acknowledged me as we entered but continued to work on a very curvacious block for some lucky milliner.

I was not allowed to take pictures inside his workshop, which was much smaller than I would have imagined, but absolutely chock-a-block (pardon the pun) with sweeping, swirling hatblocks.  Truly incredible!  My breath was practically taken away with the range I saw there.

I asked if any were for sale.  Yes, with a waiting period of about 6 weeks. Not bad.  How much for the incredible swirled beauty I fell in love with?  600 Euros.  You do the math....

I asked cryptically, "Philip Treacy, Stephen Jones?" "Oui!" responded Madame Re. So THIS is where Philip Treacy has those incredible hatblocks made! Some milliners send in illustrations of the blocks they want but the traditional way is to send a sparterie (or buckram, I suppose) model so that Monsieur Re can make an exact replica.  Cool!

Here's the picture of Madame Re and me in their foyer.


We left Paris and headed to the South of France and the Cinque Terre in Italy.  Also to my teaching assignment at Lucy Till Hats in St. Quentin La Poterie.  More about those in my next past.  Upon our return to Paris I found more millinery establishments.

I tried to no avail to get into Legeron, the foremost flowermaking atelier in the world.  They had agreed to give me an appointment, but when it came time to actually come through with the appointment I could never get a date set with them.  Maybe they were busy.  This is the ONE place I really wanted to visit.  I did find them and here is the picture.  I almost had the nerve to just go knock on their door, but it was lunch time, and you do NOT interrupt the French during lunch!  So, maybe next time.

Here's the picture of the entrance to Legeron anyhoo.


I also went to one of the few millinery supply houses in France--Artnuptia, also in the millinery district.  I bought some great printed and embroidered sinamay that we can't easily get in the US.  I also bought some flocked tulle that I've never seen.  They have lovely feathers and flowers as well, and many trimmed out hats that perhaps someone on staff makes.  My stash just arrived today!


Ultramod is another millinery and trim shop that I visited in the millinery area.  Beautiful old petersham from the WWII era, and some vintage blocks that I'd love to have.  Could have spent much money but I'd already spent my budget at Artnuptia.


That's it for this post.  I'll be adding other posts about the trip in the next week or so.

Thanks for reading!

Sunday, September 25, 2011

Blocking a Fur Felt Hat...before France!

I have been busy packing my bags for France for the last few days, but have had loads of nervous energy that I had to expend some way.  So I've been making hats!  What else?

This Summer I was lucky enough to purchase about 15 fabulous vintage hatblocks and I've been using those with some soft, luxurious fur felt hoods.  This post is about the latest hat from one of the blocks.

Here's one shot of the final product.  The photos are not going to show the interesting color of this felt.  It is somewhere between hot pink and orange, with a tint of purple-blue.  At first I didn't like it but it has grown on me.


Here's the block covered in Press n Seal, which works much better than clingwrap.  (It actually sticks to the block and protects it better.) I love the deep 'S' in the tip.  This is the kind of block that creates the complete hat, not just a crown that will be added to a brim.  I'm not keen on brim brimmed hats so this suits me just fine.

...and a better view of the tip.


I've steamed the hood and pulled it over the block, using a wide elastic band to hold it against the block at the headsize opening.  That elastic also allows me to pull any fullness under it.  I've used smooth roping to hold the felt against the tip indent--the 'S' on top.

After the felt has cooled down and dried I remove the roping and let it continue to dry underneath.  I don't saturate my felts with water as some milliners do.  The steam and maybe a spritz of water where needed work just fine, and it cuts WAY down on the drying time!


I don't like stiff felts so I don't always use sizing on my felts.  However, the fur felt in pretty flexible and I want it to be a little stiffer, particularly to help hold the shape of the 'S'.  I sprayed the inside of the hood with felt stiffener, and used a foam brush to help the stiffener penetrate the felt.

Here I've cut the excess away from the bottom of the form so that I'm left with the hat shape.

I've tucked under the edge of the hat so that there isn't a raw edge to the headsize opening.  I've used clothespins to help hold the edge under, plus I've dampened the edge to help hold it to the inside.  The pins are also helping to hold the hat up without it laying flat on the table and perhaps misshaping the hat shape.

After I've creased the edge of the hat I then unfold it and pin my petersham ribbon to the edge.  I love to add a different color petersham as a surprise to the inside of the hat! Sew on with a very tiny stitch.  No visible stitches!!!

To help keep the 'S' in the tip I've added some invisible stitching to the outside of the hat, but very visible on the inside.  I cross back and forth on the inside, pulling the edges of the 'S' toward each other.

Not sure how much you can see here, but this is the inside of the hat with the stitches to hold the 'S'.  Stitches are to the right of the needle in this picture.  I've seen this technique in many vintage hats to help hold a crease, a shape, an edge.

Front view with the fan made from the roundings cut from the edge.

Further around the side with the fan and the velvet orangy-red velvet ribbon with the purple satin underside, laid out in a chevron style.

Close-up of the velvet ribbon chevron.

I will be posting again once I return from my teaching trip to France.  I hope to have some fantastic pictures of some amazing millinery establishments in Paris.  Stay tuned and I'll see you in about 4 weeks!!!

 We will be making some additional changes to the look of the blog over the next few weeks.  Enjoy!