
One of the classiest ways to trim out a hat is with a beautiful bias edge. There are other ways to finish the edge of hats, especially big-brimmed hats. You can add a petersham ribbon edge, as is seen on many men's hats especially, or turn the edge of the straw or felt under and hand-stitch using a pick stitch. (If you don't know what these are I promise to do tutorials on these in the future.)
This hat is an example of the bias edge I'm talking about. The bias can be fabric or, in this case straw...sinamay straw.

The polka dot sinamay was blocked over a flat vintage brim block. Instead of adding a crown to it, I decided to keep the 'neck' from the block and use it as a very shallow crown. Certainly this crown wouldn't sit down on the head, but many vintage and contemporary hats do not have traditional crowns. Anyway, what you see in this following picture is the hat (called a platter) after it was stiffened and the brim edge wired for stability. The edge of the brim is turned under but is raw cut on the under side. This will be covered up with the bias cut sinamay.
Let's do this thing!

I use a very long wooden lathe piece of wood I got at the hardware store to help measure long expanses of sinamay or fabric. The lathe is much longer than a yardstick, and since most of my bias strips are longer than a 36" yardstick, and I need a very hard straight-edge, I use the lathe.
I lay my sinamay (or fabric) out on a large flat space. This allows me to use the tape measure to find the bias length I need to go around the brim edge. I have already measured around the circumference of this brim so I know what that length is. In this case it is 47". I use the tape measure to find where, on the sinamay, I can get a full 47", plus another 2-3", which I'll explain later.

Once I have found my length of 47" + 2" (49") I mark it with a chalk (on dark material) or pencil (on light colored material), using the wood lathe to keep my line straight.

Follow closely while I explain the next step as it is a little out of order... OK, you know how long your bias strip needs to be, but how deep does it need to be??? Here's my rule of thumb: decide how much fabric you want to see on the top and bottom side of the brim--the depth of the bias edge. I usually choose it to be 1/2", but you can choose whatever you like. Whatever depth you choose is multiplied by 4. My example would be 1/2" x 4 = 2". That's how deep my bias strip needs to be. So my bias strip would be 49" long and 2" deep. Got it? Now, add a bit more to that depth, maybe a 1/4". Why? Because the bias strip will need to roll over the edge of the brim and that takes up some of your bias depth. So in actuality my bias strip is 49" long and 2.25" deep. Wire and straw or felt can be fairly thick, and that is what takes up extra bias depth as it rolls over the side. You may need to add more than the 1/4". Sometimes I add another 1/2"! Trust me, this will all make sense as we go through this tutorial!!
Now that we have that explanation out of the way, I need to make a parallel line to my first line which will mark how deep I want my strip to be (as explained above). Below you see I've done this with the lathe and chalk. I can't stress enough that you must mark that second line exactly the depth you need. No guessing. Use your tape measure to keep that depth line correct!

Now I cut along each chalk line to get my bias strip.

To lay down the bias strip I start on the top side. Use the picture below as your guide. Note that I have turn back the end in such a way as to have it lay at an angle. It is very important that you turn back your edge.
As you lay down the bias strip around the brim edge, be sure to just slightly pull it (not too tight!) as you proceed around the circumference of the brim. Pin as you go, just as you see in the picture.

I've now pulled and pinned the bias strip around the circumference of my brim and laid down the other end of the strip across the folded end in the picture above. Be sure to cross that fold by at least 2". The fold and the crossover are the 2"-3" you added to the original length in the prep stages above.

I now am ready to start sewing the bias strip to the brim edge. I use a tape measure to mark that original 1/2" I decided would be what would show on my brim edge--1/2" on top and 1/2" on bottom. (If you are confused, please scroll back up to the top to see where this 1/2" measurement comes from.)
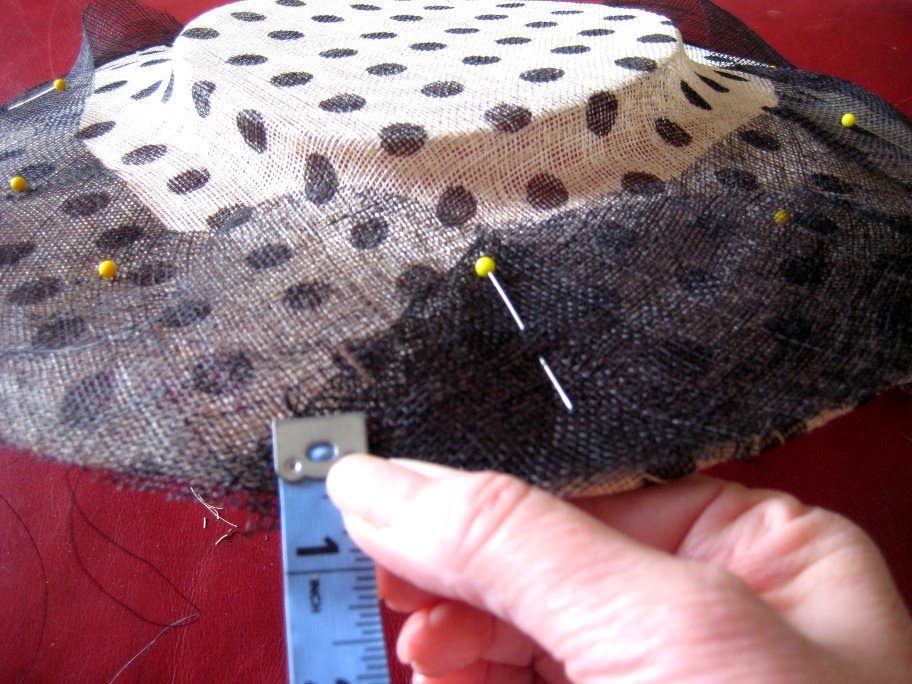
Below you see that my stitching (a backstitch) is 1/2" from the brim edge. I measure each and every stitch as I place my needle. It is very easy to sew uphill or downhill and you need a VERY straight line of stitching for a smooth edge once the bias flips over after this step. The backstitch length is approximately 1".

Once I have sewn all the way around the brim using the backstitch, I flip the bias strip over the edge and around to the bottom side of the brim for more stitching. See my smooth edge? Trust me, that is because I measure each stitch 1/2" from the brim edge!!

Below you see the bias strip pulled to the bottom side of the brim. And you can also see the backstitching from the top side. I will now fold the raw edge of the bias under. The fold will be 1/2" and should just cover the backstitching. It should look the same as the top edge except that it hasn't been sewn down yet.

Below you see the raw edge has been folded under and I've pinned it into place to stabilize it while I sew. And this is where it gets tricky.
Everyone wants to iron their bias strips before they place them on the hat, as they would with a garment. However, with a stiff hat we are not able to manipulate the material as easily as we would with a garment. Therefore we do not iron down the bias fold because we want the folds to remain rounded to help conceal stitches. Stitches can actually hide under the folds pretty nicely. Follow me to the next picture.

I will begin stitching from bottom to top, catching the bias folded edge on the bottom only (and under that rounded edge). My needle goes through the hat and is angled up to pop out under the bias fold on top of the brim. (I am hiding my stitch to the top under the fold of the bias at the top.) My needle will be angled from bottom to top (then top to bottom) as I move around the brim edge. I am attempting to make all stitches invisible!
Said another way...I catch a bit of the sinamay, under the fold, on the bottom, then angle my needle up to the top side of the brim and have the needle come out under the fold. If I catch a bit of the upper bias strip, no problem, but I'm not trying to catch it. I'm trying to hide my stitch under the fold.
Before anyone asks, no I do not recommend 'hemming' the under side of the brim to hold down the bias. It is not nearly as clean a look, as the stitching shows more, plus you cannot bend the brim to make the stitching flow smoothly.

Needle moving under the top fold and back down to the under side of the brim. BTW, see where my bias ends crossed and made a nice diagonal seam? That's from that original fold and crossover when you first laid down the bias strip.

And here you have the finished bias project. I will say, bias trim is something that must be practiced. It must also be done properly to beautiful finish or it shouldn't be done at all. This is always a difficult technique to teach because it is so precise and even the tension of the bias and the needle and thread are a part of the process. But when it is done nicely, with no stitches showing...well, it is divine.

Thanks for bearing with me on this one. If you have any questions, please respond in the comments below.
STAY TUNED FOR A VERY IMPORTANT ANNOUNCEMENT IN THE NEAR FUTURE. YOU DO NOT WANT TO MISS THIS!!


