Showing posts with label fascinators. Show all posts

Thursday, August 16, 2012

Fascinating Fascinators--Sinamay...at Lacis

Hello, again!  This post is about my second class at Lacis in Berkeley, California, in late July.  The first class (French Flowermaking)  is further down the blog, past Jean Paul Gaultier. 

Fascinating Fascinators:  Sinamay Headpieces, was the first time I've taught a millinery class at Lacis.  It was a one-day class, specifically about using unstiffened sinamay to create abstract and whimsical fascinators.  

Unstiffened sinamay can be harder to find than its cousin, stiffened sinamay.  However, you cannot create the free-flowing curves, loops, and twists with stiffened as you can with the unstiffened.  Unstiffened usually comes in natural, white and black, although you can sometimes get it in other colors.    Seems that right before class, as we were ordering materials, we couldn't get anything but natural.  Some students brought their own unstiffened yardage, but natural was about all there was to find on the market at the time.  That is why you see so much natural in the following pictures.


 The bias of sinamay is what gives it the wonderful curving properties needed to get shapes.  Above, Donna starts the process of using the bias to create line and shape.  You will see her finished piece further down the post.


 Miko brought in ombre black/grey sinamay.  Here you see her creating some beautiful loops and bows for a lovely finished piece.


Queen brought in a brilliant red.  Using the balsa utility head as a base, she created a great headwrap.  See the finished piece further down.

Check out the following pieces.  Finished except for the final sewing together.  The design is complete.  Not much embellishment needed for these type headpieces as the curve of the piece speak volumes as to style.


So pleased with the progress and finished pieces everyone did.  Most students in the class had no millinery experience.  I think they did a fabulous job of using a millinery medium most do not use to full advantage. 


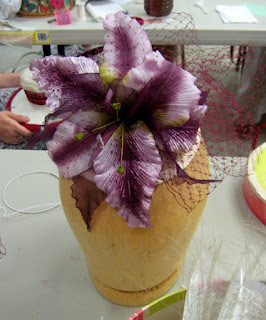
Donna in her finished piece.  You saw her just beginning the piece up at that first picture.  Oh, and that huge and smashing flower? ....created in the flowermaking class she took the two days before.  Wow!  Love it, Donna!

Ok, ok, I promise...the class at Wayne Wichern's coming up next.  Right now I'm busy packing for my annual teaching week at John C. Campbell Folk School.  That post up after I return...and after the post for Abstract Shaping at Wayne's.

Happy hatting and thanks for reading!  Tell your millinery friends about our blog.


Thursday, August 2, 2012

Fascinator Millinery Class; Alexandria, Virginia/Washington, DC


In late June, I taught a class at The Art League School in Alexandria, Virginia, a suburb of Washington, DC.  This was a very full class entitled Fashioning Fascinators.  We used quite a few millinery mediums to make the base of the fascinators.  See the following pictures for working photos and finished product.

  
 For some reason sewn braid was the base medium of choice.  Students had a choice of sewn braid or fabric covered buckram.  The 'fascinator' pieces could then be secured to headbands, elastics or used on a sinamay base.

Black triple starbright sewn braid was a favorite.  Note that the braid is being sewn on utility blocks to hold the shape.


This was a huge class of 13!  All with their own ideas of what a fascinator is.  And, by-the-way...fascinator can mean many different things to milliners and hat-wearers.  A group of  talented ladies with fascinators on their minds.

Melissa having fun!  


Sewn braid, veiling, and a peacock feather piece.

Here's a demo I did on feathers for the class.  Click here to see.  About a 4 minute demo you might find interesting.


This sweet young lady came with her grandmother to make hats!  Love it!  Isn't she sweet?  Great hat for a budding milliner.

Ranunculus flowers and hot pink sewn braid.


Melissa creates a butterfly 'bowl' with a sweep of feather spines.

Gloria's pleated ribbon trim over buckram.  Hydrangea flowers and some sweeping feathers.  Nice.


Jewels!!


Love the veil swath.

 Stylin' ladies!

Monique's gorgeous red sewn braid base with a smashing silk flowers.


Fabric covered buckram.  Beautiful batik fabric and a handmade flower.


A fascinator of two colors of triple starbright braid, sewn into circles then sewn together for a headband effect.  A twig of crin starts the embellishment process.

Here's another demo I did on using Crin (horsehair) and Sinamay as embellishment.  So many other things you can do with these materials, but hope you'll click over here to see about a 7 minute demo.

Beautiful silk flower on black triple starbright braid.  Lovely!

Next post will be of the classes in the San Francisco Bay Area--French Flowermaking, Sinamay Fascinators, and Abstract Shaping.  Soooo much to report!

Sunday, July 1, 2012

Atlanta Crin (Horsehair) Millinery Class


I'm a bit behind in reporting on my 2012 teaching schedule.  I'll be posting the three classes I've already done this year, other the the International Millinery Forum in January. (Find the IMF posts here on the blog.)  Let's start in May, in Atlanta, at the Spruill Art Center.

The class was entitled Crin (Horsehair): Hats, Fascinators & Embellishments.  I decided in this class that I was going to start calling this millinery medium CRIN, not horsehair, which is what we call it in the USA.  Crin is the standard term for this nylon woven braid that is primarily used for bows and rosettes in 'church lady hats' or the ones you see in departments stores.  But there is so much more you can do with crin.  See the following pictures of the ladies in class.


Judy works with a vintage crin with straw woven into the design.  I got this crin from a defunct hat manufacturer in California last year.  It is very nice but not that wide.  Crin comes in many designs and widths.


Love where this fascinator is going.  Good job Patrycja.


Hatsumi, who has studied millinery in Japan, works on her fascinator.


Joyce's nice use of beauty-marked crin in black and white.


Love this abstract design!


Crin fringe!!


Pretty little headband from Gloria, using two colors and textures of crin.


Judy with her vintage crin and lots of colored feathers.


Check out the two pictures of Shanna's full hat of crin.  Pretty little cloche.


Back side of Shanna's cloche.


Hatsumi's full hat. 

Each person did a full hat and then a fascinator.  Crin can be a real bear to tackle but these students did a great job of working with this very versatile millinery medium.

I'll be teach another millinery class in Atlanta, at The Spruill Art Center in September.  Here's the info on that class.

Blocking Hats: Straw/Felt Open Studio
Beginning through advanced milliners will enjoy this class of blocking straws and felts over traditional hatblocks. Studio will make available over a dozen blocks to use over the weekend. Beginners will learn the very basics of steam blocking and more advanced students have an opportunity to block as many hats as they like over the more complex hatblocks. Each will progress at their own comfort level. Learn about the blocking differences in felts, straws and other millinery mediums; puzzle blocks; shaping and couture finishing techniques. Coaching for all skill levels will be available.

Contact Spruill for registration info, fees, etc.

Stay tuned in the next few days for the class posts on San Antonio, Texas and Alexandria, Virginia.

Thanks for reading! Classes for the remainder of the year, throughout the USA, are listed here.

Sunday, February 5, 2012

International Millinery Forum--Part 2

Ready for another post about the International Millinery Forum in Australia?  I've decided to post another two entries about my experiences in Australia, and particularly IMF.  This is post #2...scroll down the page for post #1. Post #3 coming up in the next week or so.

OK!  Last post I left you after the fabulous opening cocktail party.  Early the next morning, a Monday, we began classes for the approximately 200 delegates.  Each tutor (instructor) taught 3 full day classes and 2 half-day classes.  My full day class was entitled Dyeing to Make Hats--taught on Mon, Thursday and Friday; my 2 half-day classes, Rock the Block, were taught on Tuesday morning and afternoon.

I was interviewed twice for local television.  IMF is a huge draw for the city of Wagga Wagga and it is widely covered on TV and newspaper, as well as their tourist information bureaus.  Here are a few screen shots of my interview.


Lots of pictures below of the dyeing class, where we concentrated on cold batch application, tie-dyeing, and immersion dyeing.  I'll let the pictures tell the story.


Cold batch application to sinamay, jinsin, raffia, silk straw.


Tie-dye, below, of the same straw yardages--jinsin, sinamay, raffia, silk straw.


Immersion dyeing of hoods and capelines.


Check out the gradient dyeing below!


And a couple of experiments in dip dyeing straw yardage.


And finally, the results! 


I'm thinking those dyed pieces of straw are going to make some incredibly beautiful, interestingly shaded hats and headpieces. 

On to the Rock the Block class, where everyone was learning to make inexpensive fascinator blocks, similar to the ones they had seen at the Trade Expo.  I'm certainly not trying to diminish what blockmakers do, because if you've ever tried to make a block, of any type, you know that the DESIGN is not always as easy to execute as one might think.  There are subtleties that you wouldn't even think about, believe me. 

I was, however, very pleased with the blocks the delegates made, and pleased that they listened when I instructed them to keep the design simple, at least for this first block.  Again, I'll let the pictures speak for themselves.


We even had a few who finished in time to actually block some sinamay over their new fascinator blocks.


The past two International Millinery Forums have been incredibly fortunate to be able to offer classes by one of Australia's foremost and most highly skilled milliners, Jean Carroll, OAM.  Jean began her career at the tender age of 14.  Yes, 14!  And this year, at the age of 89, she decided it was time to hang up her needle and thimble. 


IMF gave a stirring tribute to Jean at an afternoon reception after classes were over one afternoon. Although Jean didn't teach this year she told me she just couldn't stay away.  We were all so pleased to see her at all the festivities. Sydney milliner Neil Grigg emceed the proceedings and spoke of Jean's wonderful 75 year career.  I can tell you there wasn't a dry eye in the house.


Jean and Neil.  Isn't she gorgeous?  And so very classy!!  Neil, you did an amazing job!


Congratulating Jean on her career.  I asked her what she would now be doing with her days.  She answered she didn't know but that she would enjoy whatever life gave her.  How sweet.


I will leave it there for now.  Honoring Jean is a great place to end this post. 

But one more shot, below, of a very relaxing evening at the local pub with my host family, Kim and Scott; joining us were delegates Helen and Jill from Darwin.  Cheers!


Post #3 will be about the Gala and my last few days in Sydney.  Hope you've enjoyed the post!!