I just spent an incredible 8 days of teaching at
John C. Campbell Folk School in the mountains of North Carolina. I live at the beach in North Carolina, so this place is about as far away from me as you can get and still be in the same state. I love the beach...but I also love the mountains.
This was my second time to teach at the Folk School. I cannot say enough good things about it: the remoteness, the mountains, the staff, the FOOD, the activities, and some very enthusiastic students.
This post is strictly about the weeklong class. Next post will be about the weekend class.
There were other classes going on at the Folk School as well, maybe 6 or 8 others. Anything from making chocolate truffles (we all wanted to be their friends), to paper arts, to blacksmithing, to dulcimer building, and more.
Bear with me as I try to give you a taste of what it is like to be in this magical place.

Coming out of the dining hall one evening I walked past this beautifully lit bunch of flowers. I don't know what they are called but I've seen them all my life. Folklore is that once these flowers show up the first frost of the year is 6 weeks away. Loved the natural spotlight! See the mushrooms? They are carved, probably from some long ago woodcarving class, and randomly placed around the flower beds.

This is Jan Davidson, Director of the Folk School. Each morning the day starts with MorningSong. Jan told us the history of the School and how it came to be in Brasstown, NC. I wish I had the space here to tell you the whole amazing story, but if you are interested, I'd suggest going to their webpage. Interesting little note: before I was Jan Wutkowski, I was Jan Davidson. Last year when I taught at the School I didn't get to meet him, but this year I did! Turns out we had 'googled' each other for years! He's a great, gregarious guy; totally dedicated to the School, and a talented musician as well.

One of the locals at MorningSong. What's the BFD? Brasstown Fire Department!!

Reed, one of the staff the School, plays Dobro, or resonator guitar, for MorningSong...one he build in a class at JCCFS! He did one of my favorite songs, 'Dear Abby' by John Prine!

One night a week the School has a Contra, Square, Folk Dance for students and locals. A traditional band of fiddle, autoharp, and guitar played for this dance. I had done a little square dancing in college but never some of the other traditional dances, many which come from England, Scotland, Ireland. These were the people who immigrated and settled this region of America and that is where the songs, dances, instruments originated. That's Victoria, one of my students whirling on the dance floor.
I went to the dance to observe. But the locals don't allow that! They want everyone dancing!! So I did...and I do-see-doed a hole in the bottom of my foot! But what fun!! I'd do it again in a second!

'Deuce' showed up early one morning and walked me to breakfast. We were walking through the woods on the way to the dining hall and he was bouncing and running through the woods chasing squirrels, then coming right back to my side. I said, "Turn around and let me take your picture." He DID! And I got this shot of him. He had the most amazing crystal blue eyes. What a cool dog. I've have taken him home in a minute but his owner came and got him after he stayed all day...looking for a class to take I guess.
A few more shots (thanks for indulging me) and then on to the hats.

Every morning I got up and took a picture out my second story window of Farm House. Some days you couldn't see the mountains in the distance for the fog. Beautiful and eerie.

Other days the sun came up bright and shining!


I love this place! Can you tell yet?
OK, so now on to the class itself. There were 9 students in the class, and the vast majority had never made any kind of hat before. A couple had made some things and were self-taught. We were basically starting from A and trying to get to Z.
We worked a parisisal capeline (blocking, cutting, wiring, petersham), worked with sewn braid, and blocked sinamay on crown and brim blocks (and all the skills that go into putting those together), plus some featherwork.

Carol Ann with her sinamay crown and brim, putting in the petersham.

Jeanne (all the way from Oregon) finishing up her incredible two-toned sewn braid crown. Brim you'll see later.

Suzanne starting to work on her blocked brim. Lots of work goes into the processes for each kind of straw.

Leonard (all the way from California) starts the 'button' in the tip of his sewn braid Fedora. Sometimes when I teach sewn braid I hear that it is too repetitious. However, this class LOVED sewn braid. And they created some fabulous hats from it.

Susan's cloche braid hat with sequined applique. She chose not to make a brim for this hat. Love it, Susan!

Jeanne's parisisal capeline with a free-formed brim after wiring. See the leaf? That was made during the week by one of the blacksmithing students she became friends with during the class. Much prettier than this picture shows. These are the kind of friendships that develop over the week--sharing, telling stories, laughing, dancing, eating. That's JCCFS!

Cory, one of the Hosts for the School, finishing up her sinamay hat. Pretty in Black!

Couple of shots of Jeanne's sewn braid hat after it was finished. Front view.
Back view. Love the two-toned look. Putting feather pieces together was another of the skills they learned during the week. Here you see bleached peacock, biot, pheasant, and coq.

Victoria (you saw her dancing in the red skirt earlier in the post) is a Work Study student at the School. Great eye for detailed work. She was our speedy sewer!

And her finished hat! Love the aqua braid and that she chose the Fedora style. Very nice!


Two shots of Carol Ann's sewn braid hat. She used the tip of the Fedora block but stopped there to make it a fascinator. Simple and elegant. Great lines of the hat too.

OK, Suzanne! She sewed a fascinator base out of sewn braid but couldn't decide how to finish it. She tried numerous ideas. Here she decides it should just be a pirate's eye patch!!

I left Suzanne and several others in the studio the last night of class at around 9pm. They can stay as long as they like in the studio's at night--not sure how late they stayed that night! The next morning I came in to find what Suzanne decided to do with her fascinator base...she calls it 'The Night Aliens Invaded the Millinery Shop.' What a hoot! You can't tell, but there are tiny 'aliens' perched in the feathers. Suzanne had a great sense of humor and it carried through to her hats. You go, Suzanne!

Couple of other sinamay hats on display; one is Leonard's (top) and the other is Cory's. Great job!

Cory's sewn braid hat in navy straw. I love this straw and used it myself for the instructor piece all teachers are required to submit for the week.

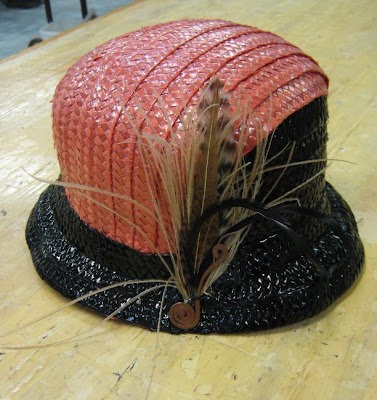
Cory's finished product after adding some swooping pheasant feathers and a bit of peacock.


The class, with me on the left, minus two who couldn't make it to the final 'Show and Tell' all classes present the last day of the week. While we displayed our hats on a table for everyone to see, when the final moment came we donned our hats and did an impromptu fashion show to the front of the exhibit hall. People loved it! We got sooo much buzz from the other students throughout the week. I even had several tell me they'll be taking millinery classes next year!
Thanks, John C. Campbell Folk School! Can't wait to get back next year!!!


