
 OK, all you readers out there. You are going to have to bear with me on this post. LOTS of pictures from last weekend's classes in Atlanta, Georgia, at the Spruill Center for the Arts. There were so many people interested in constructing wire frame hats that we had to add another class.
I've divided these pictures into two sections: Saturday/Sunday class, and Monday/Tuesday class. Each one diverse and exciting in the work they did! Scroll down to see!!!
Firstly, the picture above is by one of the four costumers we had in the Sat/Sun class. Wendy, from Savannah, Georgia, created these frames from black millinery wire. The piece on the left was the first piece she made. Everyone started with a simple headband to get the feel of how to cut wire, bind wire, bend wire and design with wire. Not as simple as it sounds. After they got the hang of that we moved to a more complex piece. Wendy choose to create this great hat of circle pieces. Isn't it wonderful?
 Jean, from Austin, Texas, working on her headband. She chose to add some curved bracing wires to her piece.
Here you see Jean's hat frame for the second piece--a modified madhatter. The fabric you see is what she will use to cover the frame.
 Randi, from Asheville, North Carolina, another of our costumers, was making a traditional Edwardian frame to use in her costumes for SASS, an organization of people who love to shoot vintage firearms...while in vintage costume! She had everyone excited about what she does and the organization she represented. Later in this blog you'll meet another member of SASS. SASS stands for Single Action Shooter's Society--a worldwide organization. Fascinating!
 Another shot as the piece began to take on a final form. To the left you see Kenna, another of our costumers. She's creating a crownless hat.
 Here's the beginning of Kenna's crownless hat. I always love to have costumers in a class. They know soooo many secrets to sewing...and vendors.
 Kenna's finished frame, right before she began covering it with a lovely sheer fabric.
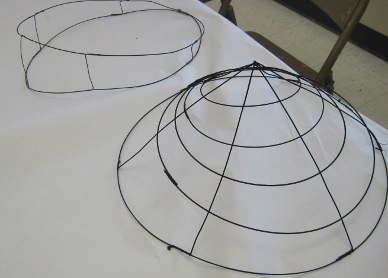 A couple of other frames from students in class, before they are covered.
 Carole, from Nashville, Tennessee, in her eyelash covered frame. She chose not to cover the whole frame, just the wires themselves.
 More info: Students took an incredible amount of time creating these frames and then, in most cases, covered the wires with either ribbon or fabric. They could then chose to cover the entire frame with sheer fabrics. Due to the time it took just to do the first two skills, I don't have any pictures of finished product. But I hope some of the students will send finished photos to me so that I can upload them to a future blog entry. (HINT!)
 Carole with her completed headband hat. She purchased some vintage leaves, flowers, and ribbon roses to cover the frame. She came into class on Sunday with this hat on and I truly believed she had a vintage hat on her head! She worked hard the night before finishing this piece.
 Sandra, another of our costumers (actually a wigmaker!), with her second wired piece. She is wearing this to a Black and Orange Ball (Halloween). The frame will incorporate a skeleton on that curvy piece you see. Sandra, please send a picture of the finished piece!
 Bethany with her second wired piece. She planned to crochet around the wire. Neat, huh?
Below you see the Monday/Tuesday class, minus one, who's taking the picture. A few of the frames can be seen in this shot. That's me on the far right, with my wacky madhatter wire hat.

 Some of you readers (especially you Facebook readers) know Andre Baxter of Christine Designs by Andre. Andre is a long-time student who has worked with me before with my hat fashion shows. Here he's working on a frame to be used later in the week for a Haute Atlanta show, part of Atlanta Fashion Week.

Close-up of Andre's frame. He was covering it in lavendar organza!

Meet Jeanette, from Albemarle, North Carolina, another costumer, and member of SASS, as described above. Her wire frame was to be an abstract flower with a bee embedded in the center. This is the beginning of the work.

Here you see Jeanette's finished frame. Lots of time-consuming, hard work to get this far!
 Another long-time student, Diane Shaggot, of Hats to Di For, who does complex, beautiful work. She, also, was very helpful to me in last year's hat fashion show here in Wilmington. Sent some beautiful hats!
 Diane's inspiration for her hat is a rose with a VERY large leaf. Note the raised round section
to the far left. That is the base for her rose...eventually. Love, love, love the leaf. She's beginning to cover the wire with green ribbon and green pipe cleaners in this picture.

Is this cool or what?! Diane, you are sending a picture of the finished product, right???
 Maggie was really into Steampunk and was making this piece for a costume she was creating. Yes, another of our costumers!

Couple of headbands by this class. On the left you see Paula's piece and on the right, Shirley's. Shirley used velvet tubing, in the true vintage style, to cover the wire.
 And another two headbands. On the left is Rebecca's and on the right another of Shirley's pieces.
 Carole with her completed headband hat. She purchased some vintage leaves, flowers, and ribbon roses to cover the frame. She came into class on Sunday with this hat on and I truly believed she had a vintage hat on her head! She worked hard the night before finishing this piece.
 Sandra, another of our costumers (actually a wigmaker!), with her second wired piece. She is wearing this to a Black and Orange Ball (Halloween). The frame will incorporate a skeleton on that curvy piece you see. Sandra, please send a picture of the finished piece!
 Bethany with her second wired piece. She planned to crochet around the wire. Neat, huh?
Below you see the Monday/Tuesday class, minus one, who's taking the picture. A few of the frames can be seen in this shot. That's me on the far right, with my wacky madhatter wire hat.

 Some of you readers (especially you Facebook readers) know Andre Baxter of Christine Designs by Andre. Andre is a long-time student who has worked with me before with my hat fashion shows. Here he's working on a frame to be used later in the week for a Haute Atlanta show, part of Atlanta Fashion Week.
Close-up of Andre's frame. He was covering it in lavendar organza!

Meet Jeanette, from Albemarle, North Carolina, another costumer, and member of SASS, as described above. Her wire frame was to be an abstract flower with a bee embedded in the center. This is the beginning of the work.

Here you see Jeanette's finished frame. Lots of time-consuming, hard work to get this far!
 Another long-time student, Diane Shaggot, of Hats to Di For, who does complex, beautiful work. She, also, was very helpful to me in last year's hat fashion show here in Wilmington. Sent some beautiful hats!
 Diane's inspiration for her hat is a rose with a VERY large leaf. Note the raised round section
to the far left. That is the base for her rose...eventually. Love, love, love the leaf. She's beginning to cover the wire with green ribbon and green pipe cleaners in this picture.

Is this cool or what?! Diane, you are sending a picture of the finished product, right???
 Maggie was really into Steampunk and was making this piece for a costume she was creating. Yes, another of our costumers!
Couple of headbands by this class. On the left you see Paula's piece and on the right, Shirley's. Shirley used velvet tubing, in the true vintage style, to cover the wire.
 And another two headbands. On the left is Rebecca's and on the right another of Shirley's pieces.
I was very, very happy with the creativity and sheer amount of work these classes demonstrated. Wire work is something that is rarely taught, not understood my many, but a large part of the history of hats. I think you will agree that whether the hats you see above were historical or contemporary, they were very creative. I can assure you of the huge amount of planning and work involved.
Thanks Spruill, for hosting these two classes! Always a pleasure!!!


