Sunday, October 10, 2010

One Tree Hill Hats--Halloween

I was recently asked by the costumer for TV program One Tree Hill to make 3 hats/headpieces for the upcoming Halloween show. One Tree Hill films here in Wilmington and it is an honor to be asked to create for the show.

They asked for a red ostrich headband (alice band), which I didn't make pictures of. I made it in one hour and it was picked up by costuming immediately, before I had a chance to shoot it. This whole order all took place VERY quickly. I was called, they had some specs for me to go by (color, shape, etc.), and I had to have the entire order ready in 2 days! Not much time for trying to second guess them or myself on the specifics they wanted. I just had to dive in and create around some general specifications.

The first hat was to be a tiny top hat, a fascinator really. It was to be orange straw with a green vine twining around the actress' face. OK, so here we go! Above you see part of an orange hood blocked over a tiny crown, a block I had to carve before the blocking took place...more time!


I took the crown off the block, which you can see to the right, and cut away the excess.


I've taken the full outside edge of the original hood and cut the length down to be used as the brim for the hat. Note that because this is a tiny hat, I also had to make a flat fell seam after I cut the brim to size. The flat fell seam creates a tidy edge and no fraying. The depth of the brim was such that I could have a turned up brim. See further down.

Before I could join the crown and brim I had to create the 'headsize' for the brim. I did this by placing it (the brim) over the base of the crown and used a basting stitch to pull the brim into the size I needed. Easy to do and this way I know the headsize for the crown and brim will be the same, since they both were determined by the block.


Now the crown and brim are joined and I've pulled up the brim for an upturned look. I'll join the crown and brim with a backstitch.


Next I've added a self-hatband, only because I didn't want to add any other colors, textures, or elements to the basic hat. This was in spec with the costumer's wishes.


And the final hat! I used millinery wire to create the vine, wrapped it in a bias cut of green satin, so that I'd get the nice fraying you see, then added the pinked satin leaves to the vine. A little black veiling and it is complete!


Another view of the Halloween hat for One Tree Hill.
Below is the process for the second hat I made for them. This one was based on a picture I was given of a 1930's style hat that the actress had worn in another episode and liked. I was to create something similar, in green velvet/velour.


I've wet-shaped buckram over a vintage hatblock similar to the crown in the picture I'd been given. I've used roping to hold the buckram against the block in the tip indent. Pins alone would never work.

Roping removed. You can now see the tip indent I mentioned above.


Crown and crown block. I've neatened the buckram shape and prepared it to be covered in fabric. A wire was added in the headsize to help keep the shape through all the process of working on it, plus the wearing. Buckram can easily get out of shape and be ruined in not secured.


There was to be no front brim, or not much of one, but a side brim was ok. Here you see the shape I came up with and the fabric in the background, ready to stitch and cover the buckram. I rarely use French elastic on my buckram edges. I prefer to make a flange, lay in the wire, whip stitch it down, then use an iron to flatten the edge if needed. It just works better for me than using French elastic.


Tip of the crown has been covered, as well as the brim. Almost ready to assemble.

Final product! Note that the brim is wider on the side, narrows at the front, and then narrows to nothing of the other side of the hat. I've added some beading in the tip indent to hold the indent in. The fabric I've used is green stretchy velour. Made it very easy to cover the form. I've also added some green veiling.

Second view of the hat.


Had a great time working on these, although from first call to pick-up was a mad dash! I almost always work better under pressure; with that said I was in perfect working conditions!!
I hope these will make it in the show. You never know about these things. Guess I'll be watching the Halloween episode of One Tree Hill to find out!

Thursday, September 30, 2010

Leather and Wool Hat

I have been working on Fall/Winter hats for about 6 weeks now. Mostly wool felts, with a few fur felts thrown in. Also a few pattern hats, which I don't usually do. I'm just no good with patterns. Although they did turn out better than expected.

Below you see a hat that more or less just 'happened' in the studio this week. I had a very supple leather, laminated in tiny, tiny shiny circles. Can you see them in the picture below?

I have been wanting to work in some leather for awhile. I've got a couple of ideas in the works, but this was my first attempt. I used a vintage buckram frame, one I've had for several years and have loved. It probably was a bridal frame at one time, but no bride of mine wears this style anymore.

So. I cut a piece of the leather in the shape of the tip of this frame and glued (yes, my munchkins) it to the buckram frame with a gem-tack glue. I very carefully did this because a lot of moisture would ruin the buckram frame, causing it to collapse or a least misshape. After that bit dried I used wool coating to cover the sides. This is a heavy woolen, almost felt, but not quite. I got it in Chicago on one of my teaching trips. I love the colors!


Above you see the inside of the buckram form after I've added the leather and woolen parts.

I've created a lining to place inside the form. You can see it to the right of the hat. See the leather tip?


Here's the hat after it has been completed. I tried numerous embellishments on its tiny frame, but all looked too overpowering or like I was trying too hard to put something on the hat. I have a hard time with too frilly or too much embellishment on hats. I like for the form of the hat to be front and foremost. I think I've mentioned that in a previous post. Anyway I decided on NO embellishment at all.


Here's the hat on a poupee. I love the almost 1940's military influence of the style. Looks like something a WAC would have worn. I may keep this one for myself.
What are your leather experiences in making hats?


Saturday, September 25, 2010

Millinery Classes Just Added--Chicago, Washington DC and France

Start saving your pennies! I've just announced a couple of classes--one very soon, one in the mid-term, and another over a year away. A year away? Yes, check it out below. Start saving your pennies! Further information, including class descriptions, can be found at my Classes webpage, www.hatshatshats.com/classes.htm .

November 13, 2010: Retro Hats From Flat Felt Skirting; Chicago, Illinois
November 14, 2010: Blocking a Wool Hood; Chicago, Illinois
Both classes being held at TLD Design Center in Westmont.

January 8-9, 2011: Sensational Sinamay (Straw)-- Two Techniques; Alexandria, Virginia (Washington, DC)
Class held at The Torpedo Factory, The Art League School.

October 1-8, 2011: Fabric Frolic on a Buckram Base...and Feathers!; St. Quentin La Poterie, near Uzes, in the South of France
October 14-16, 2011: Retro Hats From Flat Felt Skirting; St. Quentin La Poterie, France
Classes held at Lucy Till Hats.

Please contact the venues for information on Registration, as they will handle that.

I'll be adding more classes to the 2011 roster as they are finalized, but wanted these to go up now!

Hoping to see you in class!!!!

Sunday, September 19, 2010

Wired for Fashion: Wire Frame Hats--Atlanta, GA

OK, all you readers out there. You are going to have to bear with me on this post. LOTS of pictures from last weekend's classes in Atlanta, Georgia, at the Spruill Center for the Arts. There were so many people interested in constructing wire frame hats that we had to add another class.

I've divided these pictures into two sections: Saturday/Sunday class, and Monday/Tuesday class. Each one diverse and exciting in the work they did! Scroll down to see!!!

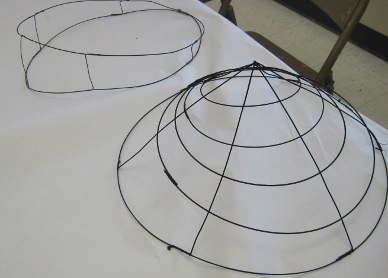
Firstly, the picture above is by one of the four costumers we had in the Sat/Sun class. Wendy, from Savannah, Georgia, created these frames from black millinery wire. The piece on the left was the first piece she made. Everyone started with a simple headband to get the feel of how to cut wire, bind wire, bend wire and design with wire. Not as simple as it sounds. After they got the hang of that we moved to a more complex piece. Wendy choose to create this great hat of circle pieces. Isn't it wonderful?

Jean, from Austin, Texas, working on her headband. She chose to add some curved bracing wires to her piece.


Here you see Jean's hat frame for the second piece--a modified madhatter. The fabric you see is what she will use to cover the frame.

Randi, from Asheville, North Carolina, another of our costumers, was making a traditional Edwardian frame to use in her costumes for SASS, an organization of people who love to shoot vintage firearms...while in vintage costume! She had everyone excited about what she does and the organization she represented. Later in this blog you'll meet another member of SASS. SASS stands for Single Action Shooter's Society--a worldwide organization. Fascinating!

Another shot as the piece began to take on a final form. To the left you see Kenna, another of our costumers. She's creating a crownless hat.

Here's the beginning of Kenna's crownless hat. I always love to have costumers in a class. They know soooo many secrets to sewing...and vendors.

Kenna's finished frame, right before she began covering it with a lovely sheer fabric.

A couple of other frames from students in class, before they are covered.

Carole, from Nashville, Tennessee, in her eyelash covered frame. She chose not to cover the whole frame, just the wires themselves.
More info: Students took an incredible amount of time creating these frames and then, in most cases, covered the wires with either ribbon or fabric. They could then chose to cover the entire frame with sheer fabrics. Due to the time it took just to do the first two skills, I don't have any pictures of finished product. But I hope some of the students will send finished photos to me so that I can upload them to a future blog entry. (HINT!)


Carole with her completed headband hat. She purchased some vintage leaves, flowers, and ribbon roses to cover the frame. She came into class on Sunday with this hat on and I truly believed she had a vintage hat on her head! She worked hard the night before finishing this piece.

Sandra, another of our costumers (actually a wigmaker!), with her second wired piece. She is wearing this to a Black and Orange Ball (Halloween). The frame will incorporate a skeleton on that curvy piece you see. Sandra, please send a picture of the finished piece!

Bethany with her second wired piece. She planned to crochet around the wire. Neat, huh?

Below you see the Monday/Tuesday class, minus one, who's taking the picture. A few of the frames can be seen in this shot. That's me on the far right, with my wacky madhatter wire hat.


Some of you readers (especially you Facebook readers) know Andre Baxter of Christine Designs by Andre. Andre is a long-time student who has worked with me before with my hat fashion shows. Here he's working on a frame to be used later in the week for a Haute Atlanta show, part of Atlanta Fashion Week.


Close-up of Andre's frame. He was covering it in lavendar organza!


Meet Jeanette, from Albemarle, North Carolina, another costumer, and member of SASS, as described above. Her wire frame was to be an abstract flower with a bee embedded in the center. This is the beginning of the work.


Here you see Jeanette's finished frame. Lots of time-consuming, hard work to get this far!

Another long-time student, Diane Shaggot, of Hats to Di For, who does complex, beautiful work. She, also, was very helpful to me in last year's hat fashion show here in Wilmington. Sent some beautiful hats!

Diane's inspiration for her hat is a rose with a VERY large leaf. Note the raised round section
to the far left. That is the base for her rose...eventually. Love, love, love the leaf. She's beginning to cover the wire with green ribbon and green pipe cleaners in this picture.


Is this cool or what?! Diane, you are sending a picture of the finished product, right???

Maggie was really into Steampunk and was making this piece for a costume she was creating. Yes, another of our costumers!


Couple of headbands by this class. On the left you see Paula's piece and on the right, Shirley's. Shirley used velvet tubing, in the true vintage style, to cover the wire.

And another two headbands. On the left is Rebecca's and on the right another of Shirley's pieces.
I was very, very happy with the creativity and sheer amount of work these classes demonstrated. Wire work is something that is rarely taught, not understood my many, but a large part of the history of hats. I think you will agree that whether the hats you see above were historical or contemporary, they were very creative. I can assure you of the huge amount of planning and work involved.
Thanks Spruill, for hosting these two classes! Always a pleasure!!!

Monday, August 16, 2010

John C. Campbell Folk School--Millinery Class

Last weekend I taught for the very first time at John C. Campbell Folk School in Brasstown, North Carolina. The Folk School, as it is affectionately known, is 85 years old and was started as a means of preserving the crafts of the Appalachian Mountains and the people who lived there. Today there are an incredible number of arts and crafts taught there every week and weekend--from blacksmithing, to basketry, to woodturning, to clogging (a traditional mountain dance style), to printmaking, to....just name it!


The Folk School is in the Blue Ridge Mountains in the shadow of the Great Smokey Mountains. Here you see a little of what the scenery is around the School.


There are numerous original and new dormitories and studios around the campus, which sits on many, many acres. Here is the Farm House, where I stayed for the weekend. It was lovely!


Mountain tradition is that every day starts with MorningSong. At the Folk School either one of the locals comes in, or in this case one of the weekend instructors did MorningSong. This is Aubrey, who taught clogging over the weekend. Turns out she also sings beautifully and plays banjo, mandolin, and guitar. This picture show her playing banjo and doing some fancy clogging steps. She was fabulous!


Here you see the last morning of class, right before we went to the final presentation of each class' work for the weekend. We had a class of 12, including my assistant, David, whom you see at the far right. Many of the class had to leave before 'presentation' due to the great distances they travelled to get to the School.
The purpose of this class, 'Crowns and Brims: A Millinery Survey,' was to learn through observation and practice, skills including wire construction, fabric covered buckram, blocking straw, and sewn straw braid. This was not an in-depth study of any of these, yet a means to be exposed and practice at least two of the skills into one hat. e.g. straw crown with wire brim, buckram crown with straw brim, etc.


Here's Sonja with her finished product, a gorgeous wire construction brim (covered in black and white silk) with a fabric covered buckram brim. Just gorgeous!


Here you see her after she's finished the construction and is covering the frame with silk.


The early work in the construction process. Not quite as easy as it looks!


David, my studio assistant, chose to create a wire frame brim with buckram crown, as well. What a colorful guy in his elegant hat! Great job, David! Now here's a hat lover! You should see his collection! And what great guy! He kept us all sane...well, most of us!


Ah, David and Sonja HARD at work on their wire frames. Sooo much time spent in creating the frames, but with such wonderful results.

Gerald was the other man in our class. I didn't get a chance to photograph his finished product but he did an amazing job! Here he's working on this fabric covered buckram brim. He chose a blocked sinamay crown to pair it with.

Below you see some of the class with their final project, minutes before we did a catwalk before the whole school (about 100 attendees/instructors). Most classes displayed their work on tables, we strutted ours!! Such fun!!!!


Beautiful Sara in her purples and lavenders! She worked incredibly hard on her hat.

Mollie in her wire frame brim, draped in a sheer dotted fabric, with a silk covered buckram crown.

Pictures don't do this hat justice! This was a smashing hat!

Robbie begins her huge, no HUGE, wire frame hat!

See where this is going? Love the conjunctive wires.


Trying it on for size. This took an amazing amount of work to get it this far.


The final hat! The wire frame was draped in a stretchy netting that beautifully covered the circumference and area of this hat. Note the tiny silk crown--covered buckram.
I have to give Robbie, Mollie, and Sara some extra credit. They each stayed up until 3am to complete their hats before presentation on Sunday morning. Others of the class stayed up working in the studio until midnight! Now that's dedication!!!


Cathy working on combining the straw brim with the buckram crown.


Cathy's final product. Love the color combination! Cathy did beautiful handwork.


Leslie and Jan work on their hats. Leslie chose a wire frame crown and a blocked straw brim; Jan chose a straw crown and a wire brim.


Love the final outcome, Jan! And the neutral colors are soft and pretty.


Karin chose a blocked sinamay crown and a blocked straw brim. Note the stash of embellishments in front.


Karin in her finished product; again, right before presentation. Nicely done, Karin!


Thanks to the students who listened, took challenges, worked hard, played nice with each other, and trusted me as their instructor. Your willingness to trust me in the work I outlined for you is muchly appreciated.
And thanks to the amazing Folk School for the opportunity to teach there for the first time. I do look forward to returning next year for a week-long class, followed by a weekend class.