Tuesday, July 12, 2011

Dyeing Straw--Millinery Class in Atlanta, Georgia

This past weekend I taught a spanking new millinery course at the Spruill Center for the Arts, entitled 'Dyeing To Make Hats.' It is a class I've been thinking about for quite some time; a skill I've been working on for my own hats for a few years now.

Have you wanted to dye your own straw, whether a hood, capeline, or one of the straw yardages like sinamay, paris cloth, jinsin, silk straw or raffia? See the results of this class' wonderful dyed straws.

All these beautifully dyed straws began as natural or white straw and were dyed with professional, permanent, fiber reactive dyes. Easy, safe, and effective.

HINT: International Millinery Forum attendees...check this post out. Details forthcoming about this class at IMF in January 2012.

A look at some of the dyed straw yardages as they dry and are made ready for the hatmaking portion of the class. Note that each straw is different...from painted flowers to stampings to abstract usage of dye on straw.


Here are a few of the stamps used in class. Very simple but used to beautiful advantage!

Suzanne did a fantastic job of using stamps and stencil brushes to create this design on silk straw.


Absolutely love this Asian-inspired design (partly done with chopsticks) by long-time student Judy. Great colors too.


Claire created this simple but lovely polka-dot design on raffia. See the great fringe?


Oooohhhhh! Gotta love this stamping/drizzling piece by milliner Diane of Hats To Di For! Pretty blue butterflies!


Here's an example of a free-hand design created by Margalee. Quite nice!


Claire and Suzanne hang up some of the dyed and washed out straws. More about that next.


After we vat dyed, tie-dyed, painted and stamped our straw yardage, and then allowed it to 'batch' for a period of time, it was time to wash out the residual dyes. Rinse, rinse, rinse, rinse. Right class? Rinse, rinse, rinse....


Sonja and Gloria with a couple of end result hats dyed in class. Sonja (left) in her tie-dyed sinamay and Gloria in her vat dyed parisisal hood. Both free-style shaped. Lovely!


Claire in her chartreuse dyed hood which she then free-form blocked. This was Claire's first true millinery experience and she did a fantastic job!


Sonja in a free-form silk straw. GORGEOUS! Love, love, love the lines!


Margalee in hot pink silk straw fascinator. Don't you love this?


Pretty tie-dyed sinamay from Gloria. Gloria is the milliner behind Gloryous Hats.


Stop the presses! Sonja's free-form styled green raffia straw topper. Everyone loved this! Vat dyed raffia yardage.


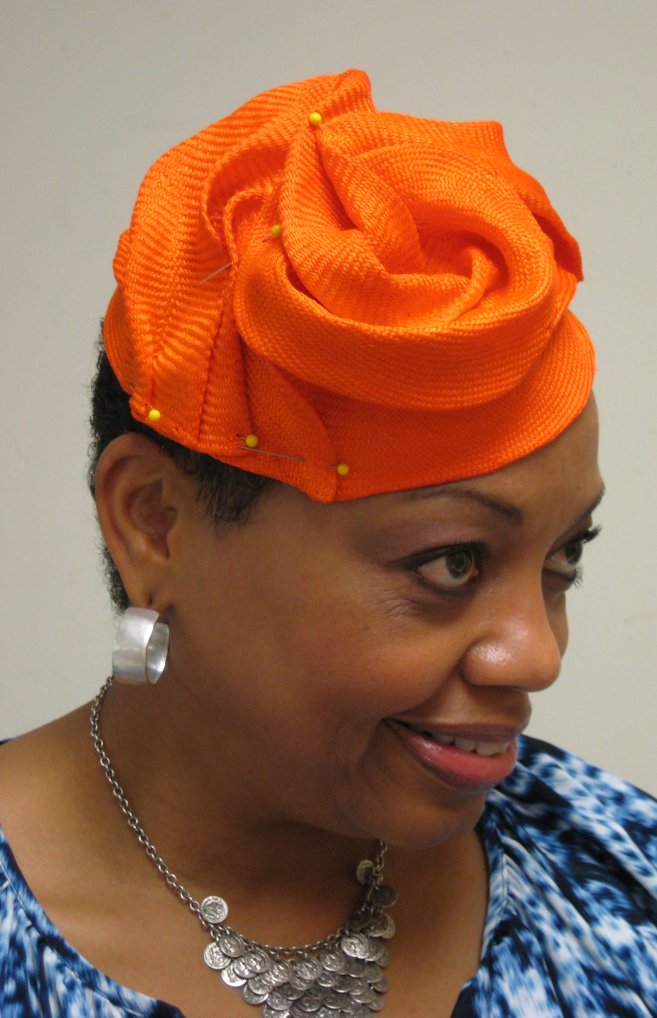
Another of Sonja's hats...dyed and styled in class.


Ooooooo. Love Margalee's tie-dyed headpiece you see here. This is an easy technique of dyeing but with dramatic effect. Margalee and her sister Melissa (see later post) have heretofore done mostly Kentucky Derby type hats, since they are from Kentucky! But I have a feeling they will be expanding their scope of styles for those ladies attending Derby next year.


Claire in her purple tie-dyed fascinator. Her second hat ever! Great job, Claire!


Diane takes her 'eggplant' knotted sisal hood and creates this amazingly styled fascinator. Who needs embellishment with design like this? Love it!


Melissa (from Kentucky) spent alot of time designing and creating this bias-fringed, tie-dyed fascinator. I think it is a fantastic piece, and a departure from the styles she and her sister Margalee are usually creating. Love it that they are open to new styles for their clients.


Suzanne, an art history major, used her vast artistic knowledge to create her pieces of tie-dye, stamping and drawing yardage. Great use of color ranges and styles, Suzanne!

As usual, you are looking at pieces that may or may not be completely styled and finished hats and headpieces. I always treat my classes as 'process not product'. In other words, you will know a number of techniques at the end of my classes, but your hat may or may not be complete as far as embellishments, etc. I think learning the millinery techniques is so very important. Everyone can embellish to their heart's content either in class (time permitting) or at home with all your accoutrement. A very personal decision, and one I really shouldn't even be involved in with your hat. I'm soooo much about the technique being perfected, NOT just the embellishment.

I hope you enjoyed just a taste of what it takes to dye straws. Look for classes in 2012 that will expand this newly created class from moi!

Tuesday, June 28, 2011

International Millinery Forum Announcement!

Hi, everyone! So excited to tell you that I've been chosen to teach at the International Millinery Forum in Wagga Wagga, New South Wales, Australia in January 2012!!!! I am so very honored to be asked.

Much more information is forthcoming but you might want to pop over to their blog and see the announcements as they are posted. Here's the link--International Millinery Forum Blog.

International instructors are: Lina Stein (Ireland), Misa Harada (UK), Eugenie van Oirschot (Netherlands), and ME (US). A whole host of Australian milliners including Richard Nylon, Neil Grig, Waltraud Reiner, Serena Lindeman, and Jane Stoddart, plus many others, will teach a wide selection of millinery techniques over a 6 day period.

You would NOT be disappointed to attend this event, held every other year. This is the 3rd IMF and it promises to be even bigger and better than the last two. Believe me, that is saying a LOT, as I've taught at the past two as well, and I know the quality of the classes and the organization.

Get yourself to OZ!!! And keep checking the blog...

Monday, June 6, 2011

Millinery Courses in France--Buckram, Surface Design, Feathers, Flat Felt

Have you heard that I'll be teaching in the South of France in October? No? Well, listen up!

Milliner Lucy Till has graciously invited me to teach in her beautiful atelier. Two classes--a one-week class entitled Fabric Frolic on a Buckram Base...and Feathers!, and a shorter 3-day class entitled Retro Hats From Flat Felt Skirting, will be held in early October in St. Quentin La Poterie, near Uzes. Find out more about Lucy and the classes by clicking here.

Specific dates: Fabric/Buckram class is Oct. 3-7, and Flat Felt is Oct. 12-14.

Below you will see some examples of hats made by the two techniques. First up are 2 examples of hats made in a Fabric Frolic class in Australia several years ago. The last 3 pictures are of hats made in a Flat Felt class, also in Australia. Sooooo many options but here are a few.

One of many, many different ways of creating richly textured coverings from fabrics is pictured above. You will learn numerous surface design techniques for manipulating the fabrics by gathering, folding, pleating, darting, burning, overlaying, and other ways to make a textured fabric to cover your own buckram shapes, created in class. We'll make at least 3 hats in the class...and learn lots of ways to create feather mounts by cutting, curling, shaping and combining feathers commonly used in millinery.


Another example of covering a custom designed buckram shape with a custom created fabric.


The short 3-day class, using flat felt skirting (yardage), will concentrate on designing fabulous vintage styled hats and producing them from an age-old millinery medium---flat felt. You can 't make these style hats from hoods or capelines!


Below you see examples of flat felt hats.


Love to see some of my European readers for these classes! While they are listed as advanced classes on Lucy's website, they are, in fact open to anyone. I don't list any classes as beginner, intermediate or advanced, they're just all different skills. So don't let the advanced level scare you. None of the students in the above pictures had any skills in either technique and look what they created!


There is a max of 4 people for each class so don't delay in signing up! See you in France!! If you have any questions about class content, please contact me. If you have any questions about lodging, class fees, etc., please contact Lucy.


Au revoir!

Thursday, May 26, 2011

French Flowermaking and Wire Frames--Chicago

I recently taught two one-day classes at TLD Design Center in Westmont, IL (Chicago), a venue I've taught at many times. The classes were French Flowermaking and Wire: Fascinators and Bridal.

Below you see the class collection of finished flowers. Most were made from silk fabrics but I know of at least one cotton flower in the mix. Nice, huh?

I'll be teaching a flowermaking class in Berkeley, California, at the end of July. Be sure to check out my 'classes' page on my website for dates and other information.


Pretty petals all cut out according to the supplied patterns. Some ladies chose to create flowers with multi-colored, multi-textured petals. Some of these fabrics are hand-dyed. Beautiful!


Here's an example of a silk chiffon that has been hand-dyed. Lovely color combination. She created this dyed piece in an earlier class at TLD. TLD teaches many, many different fiber-related classes. Check them out!


Laura and Mary Alta begin the shaping process. Each petal is shaped with heated flower tools. Different flower tools create different shapes.


Kathleen and Peggy hard at work!


Mary Alta's completed flower. You will note that each and every one of these flowers is different, even though everyone started with the same pattern. This is the beauty of flowermaking! Variables include: different amounts of sizing on the fabrics, amount of heat and pressure on the petal pieces, the kind of fabric being used, the way the petals are assembled...all contribute to the uniqueness of each flower.


This particular flower is composed of embroidered cotton. Embroidered fabrics can sometimes be difficult to shape since the embroidery threads 'hold' the fabric in place and don't allow it to be shaped as easily, but this is so pretty!


Lovely and suitable for so many uses on hats, gowns, home decorations and more.


The second class I taught was meant to teach some very basic skills in working with millinery wire. Because of the Royal Wedding event and the attention it brought to both bridal and fascinator type headpieces, the class used the wire skills to create their own headpieces.


Peggy's completed form, wrapped in black eyelash yarn to cover the wire. I don't have a picture of her completed piece but I love the form just like it is!


Laura created a very nice form then wrapped it in hand-dyed silk.


Michele used a multi-toned yarn to cover her frame. Here you see her adding beauty-marked veiling to a certain 'space' in the form. Nice use of veiling! You'll see the completed piece further down the page.


Mother/daughter team of Dwana and Donna showing off their big-looped wire pieces. While these are not finished products, they do show great promise! Wish I could see their final embellishments!


Jennifer created a wonderful mass of wires, each wrapped in brightly colored Indian sari fabrics. What more do you need?


Pretty Edwardian-inspired wire frame, covered in lace, veiling, trims and a fabulous applique piece. Looks oh-so-vintage with a modern twist. Love it, Kathleen!


Michele's finished piece with some great 'bobbing' crystals. See the way she's added the veiling to just a small portion of 'space' on the frame? Very nice!


So that was Chicago! Next teaching gig is Washington, DC, where we'll be making Big Beautiful Brims--covering buckram frames and creating large fabric covered brims. Class is already full!


Be sure to check out the other classes I'll be teaching the rest of the year--www.hatshatshats.com/classes.htm.

Tuesday, May 17, 2011

Buckram, Bird, and Nest--The Hat!

Last post I promised to show you the progression of a custom hat I made for a client going to a Spring dance...which would also have a hat contest. She is a funky, cool dresser; lots of European designs, lots of abstract cuts, fun layering of pieces. Love her style! And she wanted a hat that would NOT be typical, something that would compliment her style.

Oh, and she is a collector of bird's nests, and wanted that to be the focus of the hat. Scroll down and follow the making of her hat. What fun this was!

I started with a Juliet shaped buckram frame. Client loves neutral tones so we decided to stay with black, to go with the fabulous black tulle skirt she was going to wear.


I've covered the buckram form with black velour. She loved the black patent leather bird I had on hand, but requested that she 'fly.' Hence, the black millinery wire you see here.


We also wanted to incorporate bits of straws, the kind a bird might use to make a nest--here you see sinamay and tangle tuft.


Starting to come together! I've attached the bird to her wire, the messy straw bits, and the moss green nest.


Here you see how I've bound the end of the beauty-marked veiling that will be added to the hat. Veiling needs to be bound on the ends before being attached to a hat or fascinator.


I used a tiny bit of super glue to attach the egg to the nest. Also, I've attached the veiling to the hat.


Next I added the lining to the hat. I attached all the elements of the hat before I added the lining so that no stitch lines would show. The lining hides those stitch lines and make a nice finish on the inside.


Here you see the lining stitched in. For some reason any kind of slick/shiny fabric shows stitch lines much more prominently than they show in person. Hence the pick marks you see in the photo above. Bummer.


Here she is! I just love this hat and that the client wanted to step out on a limb, so to speak, in her choice of design.


Close-up of the nest and egg.


And here is the client when she picked up the hat! She was sooooo pleased!


Next post will be from Chicago classes--flowermaking and wire (bridal and fascinators). See you then!