
Last year when I taught there we had extremely cold weather with snow and ice on the ground. This year the weather cooperated with us. More about that later.
The class I taught was Sensational Sinamay: Two Techniques. Class was centered on blocking sinamay crowns and brims, and then learning the skills needed to create free-form hats as the second part of the class.
Below you will see a picture made on the way home the next day. For those of you who don't know, I live in coastal North Carolina...in the southern United States. We don't do snow. At all. We freak out. Hurricanes we can do. Snow, no way!
 Below you see the first attempts of the class in blocking sinamay over crown and brim blocks. The school is in a very urban area with not much green space around our classroom. Hence, we had to lay the just stiffened pieces out on the ground. Not ideal but what we had to do.
 Below, a brim in the bush is worth, oh no, wait, one in the hand is worth two in the bush! Anyway, nice black sinamay on a vintage '30's papier mache block from Hollywood Blocks. One of my oldies!
Class members sizing, or stiffening, their crowns and brims. Had to be careful of cars (you don't want sizing on your car!), plus it was cold and that has an adverse affect on the drying of the sizing.

 Above you see Allyson ready to take her stiffened/sized crown and brim off the blocks.
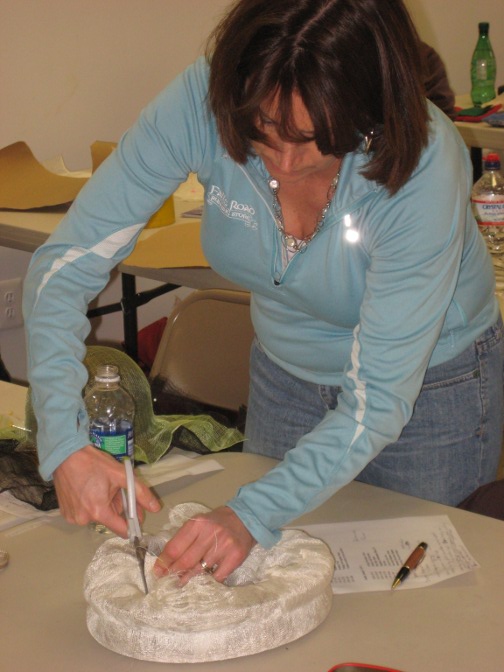 Mary begins taking excess sinamay away from the brim block. She also used one of my vintage brim flanges.
 Anneloes checks the possible headsize opening against the width of her flat brim. Note the actual crown is in front. She is just using the block to mark the headsize opening where she wants it on the brim, before she cuts the actual headsize opening in the brim.
 Penny's beautiful wide flat brim (black and red) with her headsize opening cut. Again, note her crown in front. It will be laid on top of the lip or neck she has created at the headsize opening. Very important that this part be done absolutely correctly. Also, see the paper pattern she created (in the background) to make sure the brim was the size she wanted. Much easier to cut down a pattern than man-handling the sinamay, which is very fragile at this point.
 Class shot. This was a HUGE class. We had 16 people in class! However, even with that many people, many who had never made a hat, the class worked very well together and progressed at a steady rate. Very proud of them!
 Susan places the petersham ribbon in the headsize opening. Note the stay stitches she has placed in her flat brim. This is to keep the two layers from shifting during the cutting and sewing. We use two layers for the crown and brim. This helps to maintain shape.
 Cate works on her free-form shape. While free-form shapes are not for everyone, I think it is important to experiment with what this straw medium will do. And I think the class will agree with me, free-form is fun but not as easy as one would expect in getting a shape or form that is pleasing to the eye. Somewhat like abstract painting...not as easy as it looks!
 More free-form styling by the class. Everyone is very serious at this point! Class is almost over and the clock is ticking.
How far do you take the shaping? How do you know when you've done enough? Hmmm, no real answers to those questions. You have to be your own judge, but always place the shape on your head to see what it looks like. It looks very different on the block than it does on the human head!
 Anneloes continues to shape her black sinamay. We spent about an hour in shaping, re-shaping, and re-shaping the sinamay pieces. Hint: Always work sinamay on the bias for shape.
 Nice job, Allyson! She's used some brown veiling and a nice button as embellishment for her free-form white sinamay.
 Crystal in her high-rise, very nice free-form sinamay. Several students told me they didn't think they would like the free-form part of the class, but in the end it was their favorite. Don't be intimidated by this medium. It can provide a tremendous amount of creativity to your bag of skills.
 Class shot with many of the hats made in class. Nice job, ladies!
 The rest of the class. See some nice hats in there? I do!!
The following shots have nothing to do with class. However, they do tell a story!
We knew there was a MAJOR snowstorm heading our way as we left Washington. We also knew we wouldn't run into this until we got about 2 hours from home. Below you see the road about 1.5 hours from home. Traveling about 70mph. Not bad.

 Here you see the rapidly deteriorating conditions. Here we are about 1 hour (normally) from home. Traveling about 20mph. And in a looooong line of travelers.
 Just getting into to outskirts of the city. It doesn't look it, but there was about 9" of snow on the ground here. Please note all the signage for BEACHES. It took us 9 hours to get home; normally takes us 5.5 hours. The last 90 miles of our trip took us over 4 hours!!! Sooooo glad to get home safely!
Happy hatmaking and may your travels be safe and your head warm!
No comments:
Post a Comment